Geotagging in Adobe Bridge

This script adds geotagging functionality to Adobe Bridge. As many other geotagging tools it correlates GPS trackpoint timestamps from supplied GPX track file with EXIF Create Date field from your images and then adds matching GPS coordinates to image metadata.
Basically, it does what several other external utilities do. So, why do I use it instead of already available tools? Well, several reasons:
- I’m trying to simplify my image post-processing workflow, this includes reducing number of utilities I use
- Script supports image folders. Software which I used before, couldn’t do that.
- Script also supports multiple GPX files. Same as in previous point, I couldn’t do it before I developed this script.
- It does just geotagging, that’s it, nothing else. Most of other tools are doing too much by default (creating Google maps, thumbnails and etc). I’m tired of constantly disabling features, which I never use.
Supported image formats and metadata
Script uses Adobe Bridge to read and update image metadata, so all image formats supported by Adobe Bridge are also supported by the script. Depending on how Adobe Bridges saves image metadata, GPS coordinates are stored within the image or sidecar XMP file. In general, for RAW files a sidecar XMP file gets created and for everything else data is saved within the image file.
How To Install
Download script using the link at the bottom of this page and copy downloaded file to Adobe Bridge “Startup Scripts” folder. To find your “Startup Scripts” folder go to Adobe Bridge Preferences, select “Startup Scripts” and click on “Reveal My Startup Scripts” button. It will open an explorer window for that folder.
For Adobe Bridge CS5, in Windows, the user startup folder is:
%APPDATA%\Adobe\Bridge CS5\Startup Scripts\
where %APPDATA% is C:\Users\<Username>\AppData\Roaming
In Mac OS, the user startup folder is:
~/Library/Application Support/Adobe/Bridge CS5/Startup Scripts/
To activate script, restart Adobe Bridge. Once installed, script adds a new menu item “Geotagging” in the “Tools” menu.
How To Remove
Simply delete script from “Startup Scripts” folder and restart Adobe Bridge.
How To Use
To start the script select images or folders which you want to process and pick Tools->Geotagging from the main Adobe Bridge Menu.
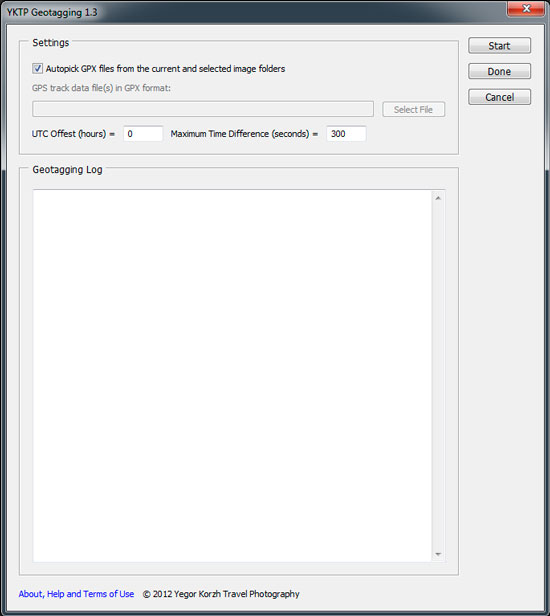
In the main window, press “Select File” button to pick GPX file with track information. You can select multiple GPX files, data from all selected files will be used during the geotagging process. Please note that it may take some time to load and sort all track points from large GPX files.
Autopick GPX files from the current and selected image folders
If checked, script tries to find all GPX files in selected and current folders and use them for geotagging. Please note, as script loads all files first, it will take a lot of time to load track data if you have many GPX files or track points. It is similar to selecting all GPX files manually.
UTC Offset (hours)
This option allows you to specify a UTC/GMT offset for image EXIF create time. For example, if your camera clock is set to Australia/Sydney time you need specify “10” in this field. If you camera clock is set to UTC/GMT time – enter “0”.
I set date and time in all my cameras to UTC and put 0 in this field.
Maximum Time Difference (seconds)
Script tries to find a GPS trackpoint with timestamp as close to image create time as possible. This setting controls the maximum difference between the image EXIF Create Date and GPS track point timestamp. If timestamp within the configured range cannot be found no GPS coordinates are assigned to the image.
For example, if your image was created on 25/01/2012 20:34:35 and closest GPS track point was made on 25/01/2012 20:34:05 and Maximum Time Difference is 30 seconds, this trackpoint will be used and saved into image metadata. If you set this field to 40 seconds, GPS coordinates will not be assigned to this image.
Terms Of Use
This software is provided “AS IS” in the hope that it will be useful, and any and all express or implied warranties are disclaimed, including, but not limited to, the implied warranties of title, marchantability, against infringement, and fitness for a particular purpose.
By downloading the software described on this page you agree that YOU USE THE SOFTWARE AT YOUR OWN RISK. THE AUTHORS MAKE NO WARRANTIES AS TO PERFORMANCE OR FITNESS FOR A PARTICULAR PURPOSE, OR ANY OTHER WARRANTIES WHETHER EXPRESSED OR IMPLIED. NO ORAL OR WRITTEN COMMUNICATION FROM OR INFORMATION PROVIDED BY THE AUTHORS SHALL CREATE A WARRANTY. UNDER NO CIRCUMSTANCES SHALL THE AUTHORS BE LIABLE FOR DIRECT, INDIRECT, SPECIAL, INCIDENTAL, OR CONSEQUENTIAL DAMAGES RESULTING FROM THE USE, MISUSE, OR INABILITY TO USE THE SOFTWARE, EVEN IF THE AUTHOR HAS BEEN ADVISED OF THE POSSIBILITY OF SUCH DAMAGES.
Help and Support
If you encountered any problems with this script, need assistance or have any suggestions, please do not hesitate to contact me using contact form on this website, or via e-mail yk-web@yktravelphoto.com
Changelog
15/08/2012, Version 1.4
– CHANGE: Performance improvements. GPX files are now loaded much faster.
12/08/2012, Version 1.3
– NEW: Autopick GPX files from the current and selected image folders
– BUGFIX: Script didn’t work properly under Mac OS
04/08/2012, Version 1.2
– NEW: Script now uses way-points, route points and track-points. Only track-points were supported in previous versions. If multiple points are found for the same timestamp – way-points have priority over route-points and track-points have priority over way-points.
12/07/2012, Version 1.1
– BUGFIX: Script could parse files of only one certain GPX specification, all others were ignored.